How workspace owners can set up teamspaces for their organization
As a workspace owner, you can ensure that all of your teammates have the right level of access to content they need throughout your workspace. If you want to start taking better advantage of this feature, here's what you need to know.
- Workspace owner’s guide to teamspaces
- Precisely control permissions and access
- Give every team member the right level of access
- Set up new teamspaces
- Understanding groups and provisioning content
Teamspaces give you more customizability and control over access levels to content, functioning like smaller workspaces within your workspace. Everyone at your company will be able to join teamspaces that are relevant to their role, and structure their sidebar to best fit their individual working needs. As an admin, you’ll have some additional security and provisioning settings to consider that can be customized with each teamspace.
If you previously operated in a workspace without teamspaces, here’s what to expect when the feature is turned on for you. All pages in the workspace section will become pages in a “general” teamspace and you’ll be free to move and create additional teamspaces as you see fit. In this guide we’ll discuss why and how to create new teamspaces.
Precisely control permissions and access
The first decision you will have to make as a workspace owner is who should be able to create teamspaces. By default, any members in your workspace (not guests) can create new teamspaces. You can change this setting with the “Limit teamspace creation to only workspace owners” toggle. Toggling this option won’t affect any existing teamspaces.
Depending on how your organization approaches content management and provisioning, you may have different considerations for whether or not to allow members to create teamspaces.
Here’s some general rules for when to allow all members create teamspaces (keep the default):
You prefer to let your employees move nimbly and set up their own structures
Limiting teamspace creation to only workspace owners would create a bottleneck in your workflows
However, you may consider limiting teamspace creation to workspace owners if any of the following apply to you:
You want more oversight over changes in your Notion instance
You want to have a centralized plan for teamspaces
You can find settings and more information in Settings & Members, under the tab Teamspaces. Here, you’ll be able to see and update which teamspaces are the default for new members to join. We recommend only having 1-3 teamspaces as default — only content that is truly necessary for every employee at your company. As you create more teamspaces, this is where you will be able to see a list of information about each of them.
Give every team member the right level of access
Teamspaces create a new layer of access to provision content to individual members of your workspace. They let you be more specific about who from your organization is able to access content in Notion, and with what level of permission. Each teamspace has a list of members and at least one owner, and you can set permission levels to content on a per-teamspace basis.
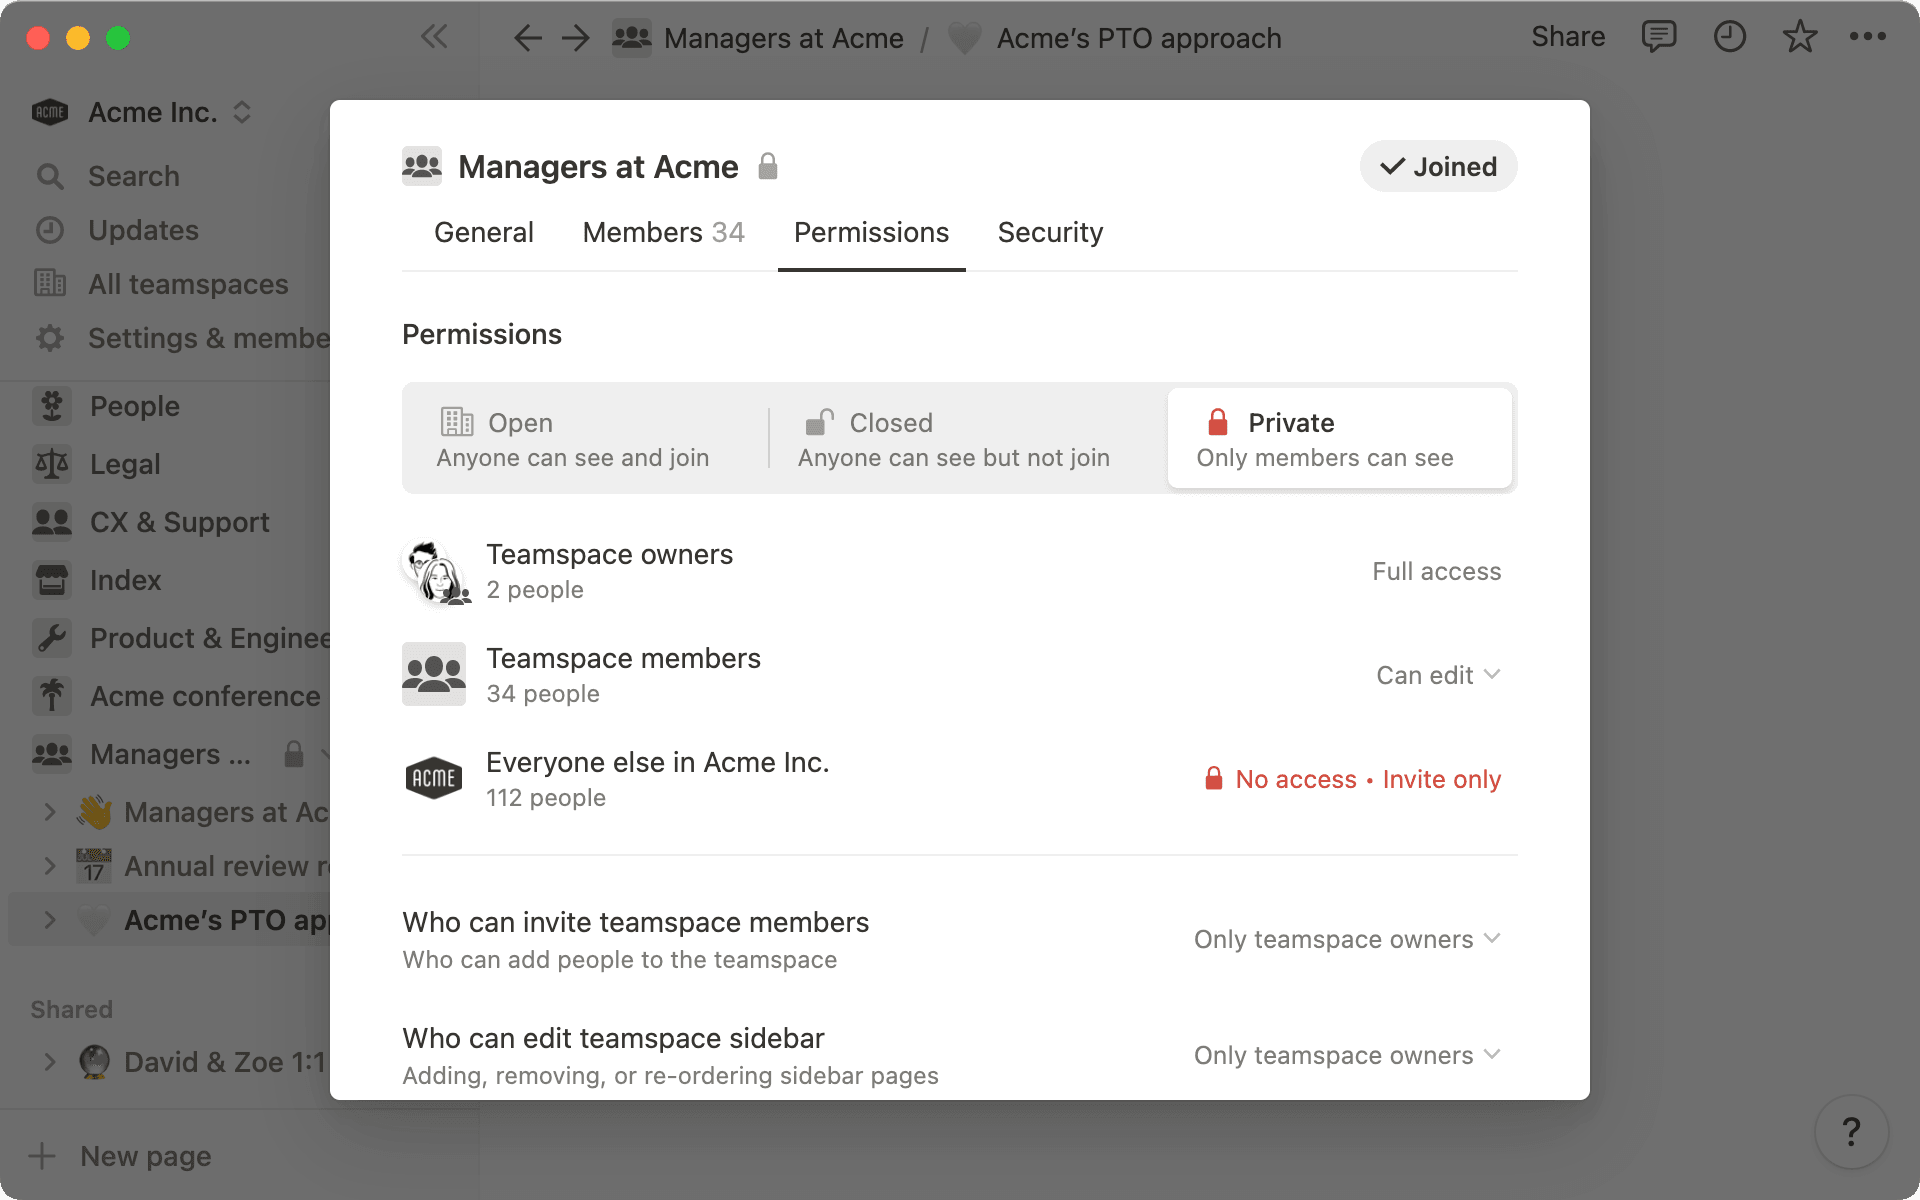
This will look different in each workspace, but here’s an example. If you create a Marketing teamspace, you can give all members of the teamspace Can Edit access, and give all other members of the workspace Can View access. By default, teamspace owners have Full Access to all content within the teamspace. Now any content you add to the Marketing teamspace will inherit these permission settings, with no further action needed on your part.
Teamspaces can help answer some of these questions you might have come across previously as a Notion admin. Here’s a few instances where granular permissions might make sense for your organization.
Automatically provision content for new hires — Once configured, SCIM will let you automatically add new hires to the relevant teamspaces via groups, making it easy for them to find the content they need on day one.
Decrease “shared page” clutter — Some work is too sensitive to be shared broadly, resulting in a messy shared section of one-off pages. A closed or private teamspace with the relevant stakeholders is a good way to keep a boundary around sensitive content while maintaining organizational structure.
Increase view-only access to important company information — When your tools are too siloed, it’s impossible to find the information you need from a different team. Converting team working documents with varied permission levels into open teamspaces allows everyone to search for and view the content, while giving editors and managers the level of freedom they need.
Prevent accidental permissions changes — One teamspace might allow members to create public pages, while another doesn’t. This prevents sensitive information from accidentally being switched to public, while keeping it visible to your whole org.

Learn more about using groups to provision teamspace content
If your workspace is on the Enterprise plan, you can configure custom settings for public page sharing, allowing guests, and allowing exports within each teamspace. By default, each teamspace will match the corresponding setting toggles at the workspace level. If you would like to override a workspace setting for a teamspace, only workspace owners have that ability.
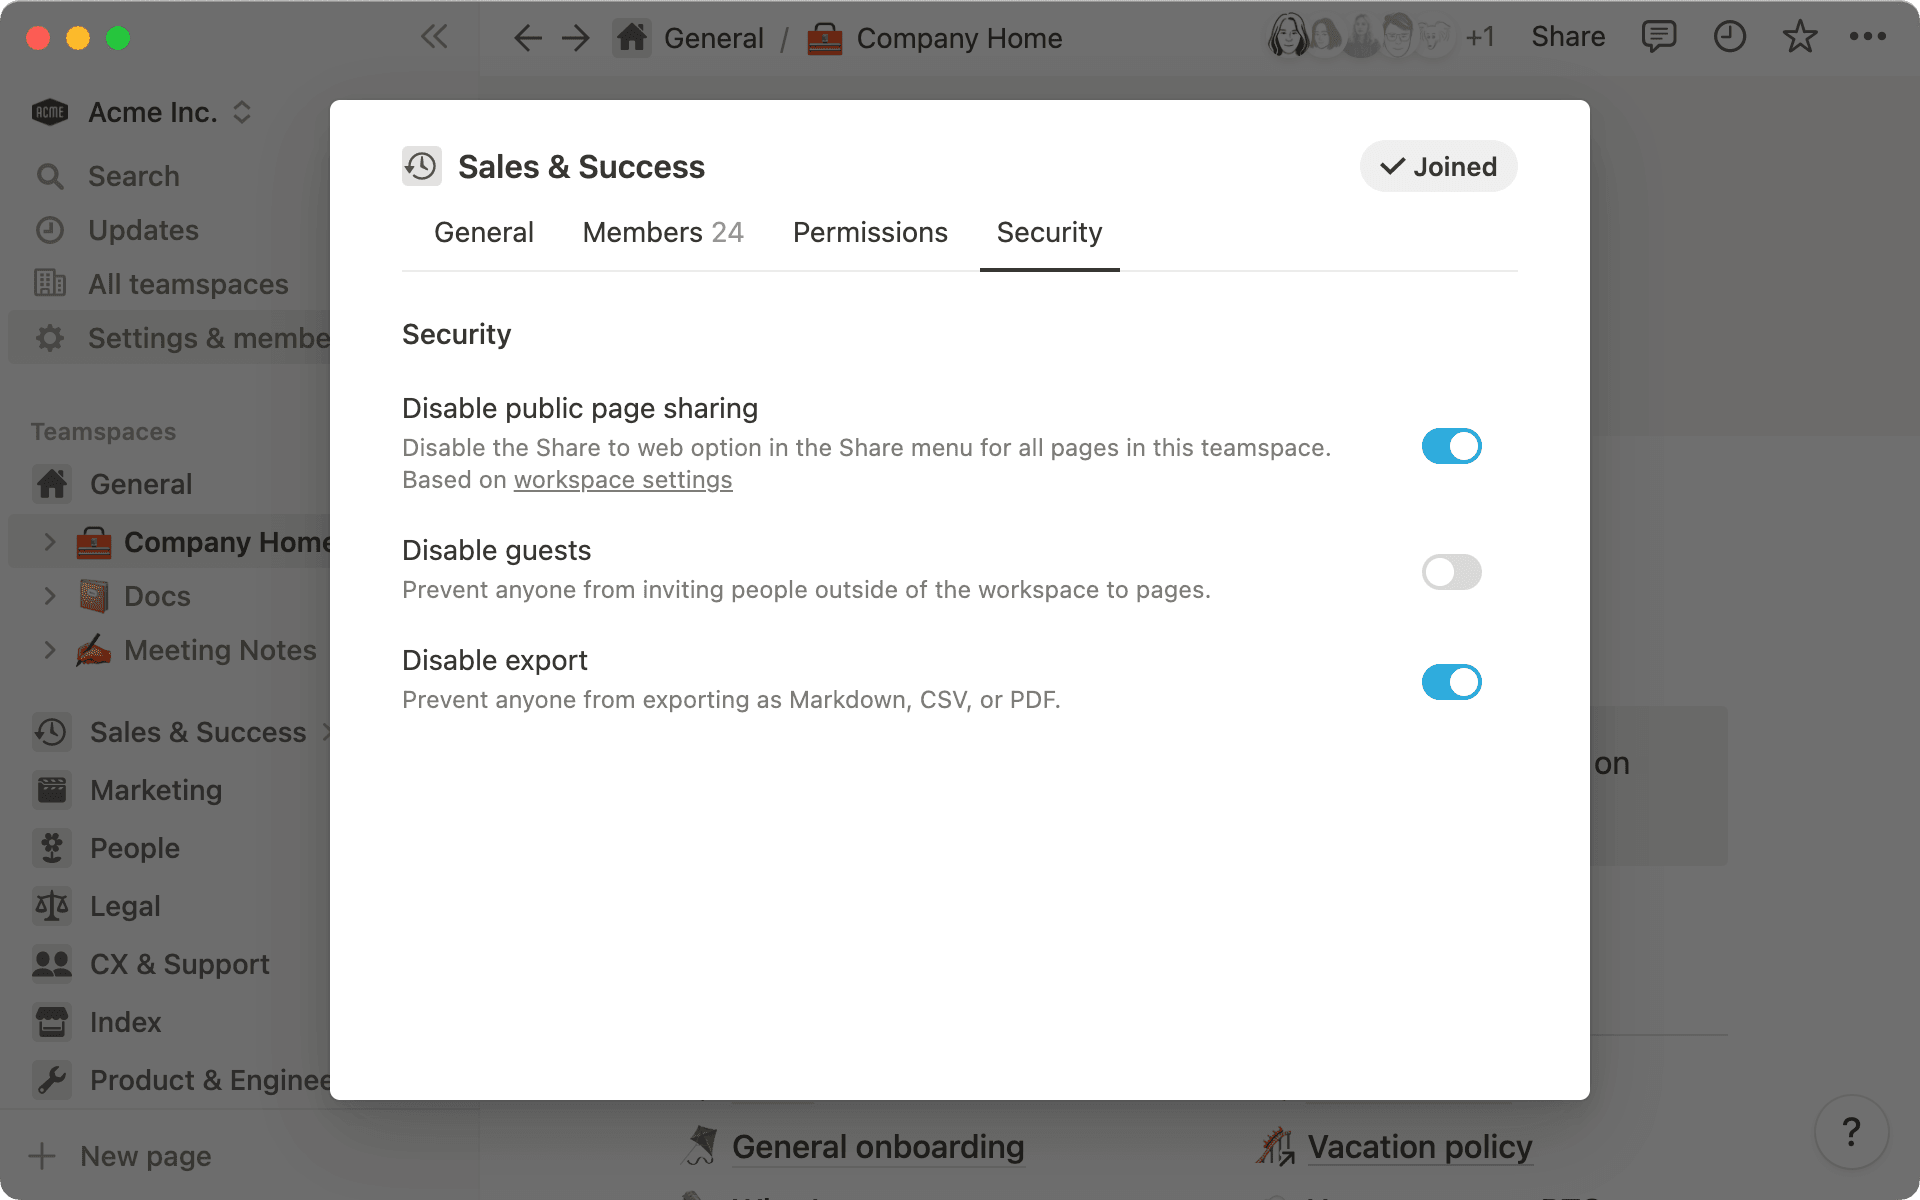
At the teamspace level, you can see “Disable guests” and “Disable export” are matching their corresponding toggles at the workspace level. Their help text reads Based on workspace settings. In contrast, “Disable public page sharing” has help text reading Overriding workspace settings and you can see it does not match the workspace level toggle.
Set up new teamspaces
Once you understand the new security settings, you’re ready to set up teamspaces for your company!
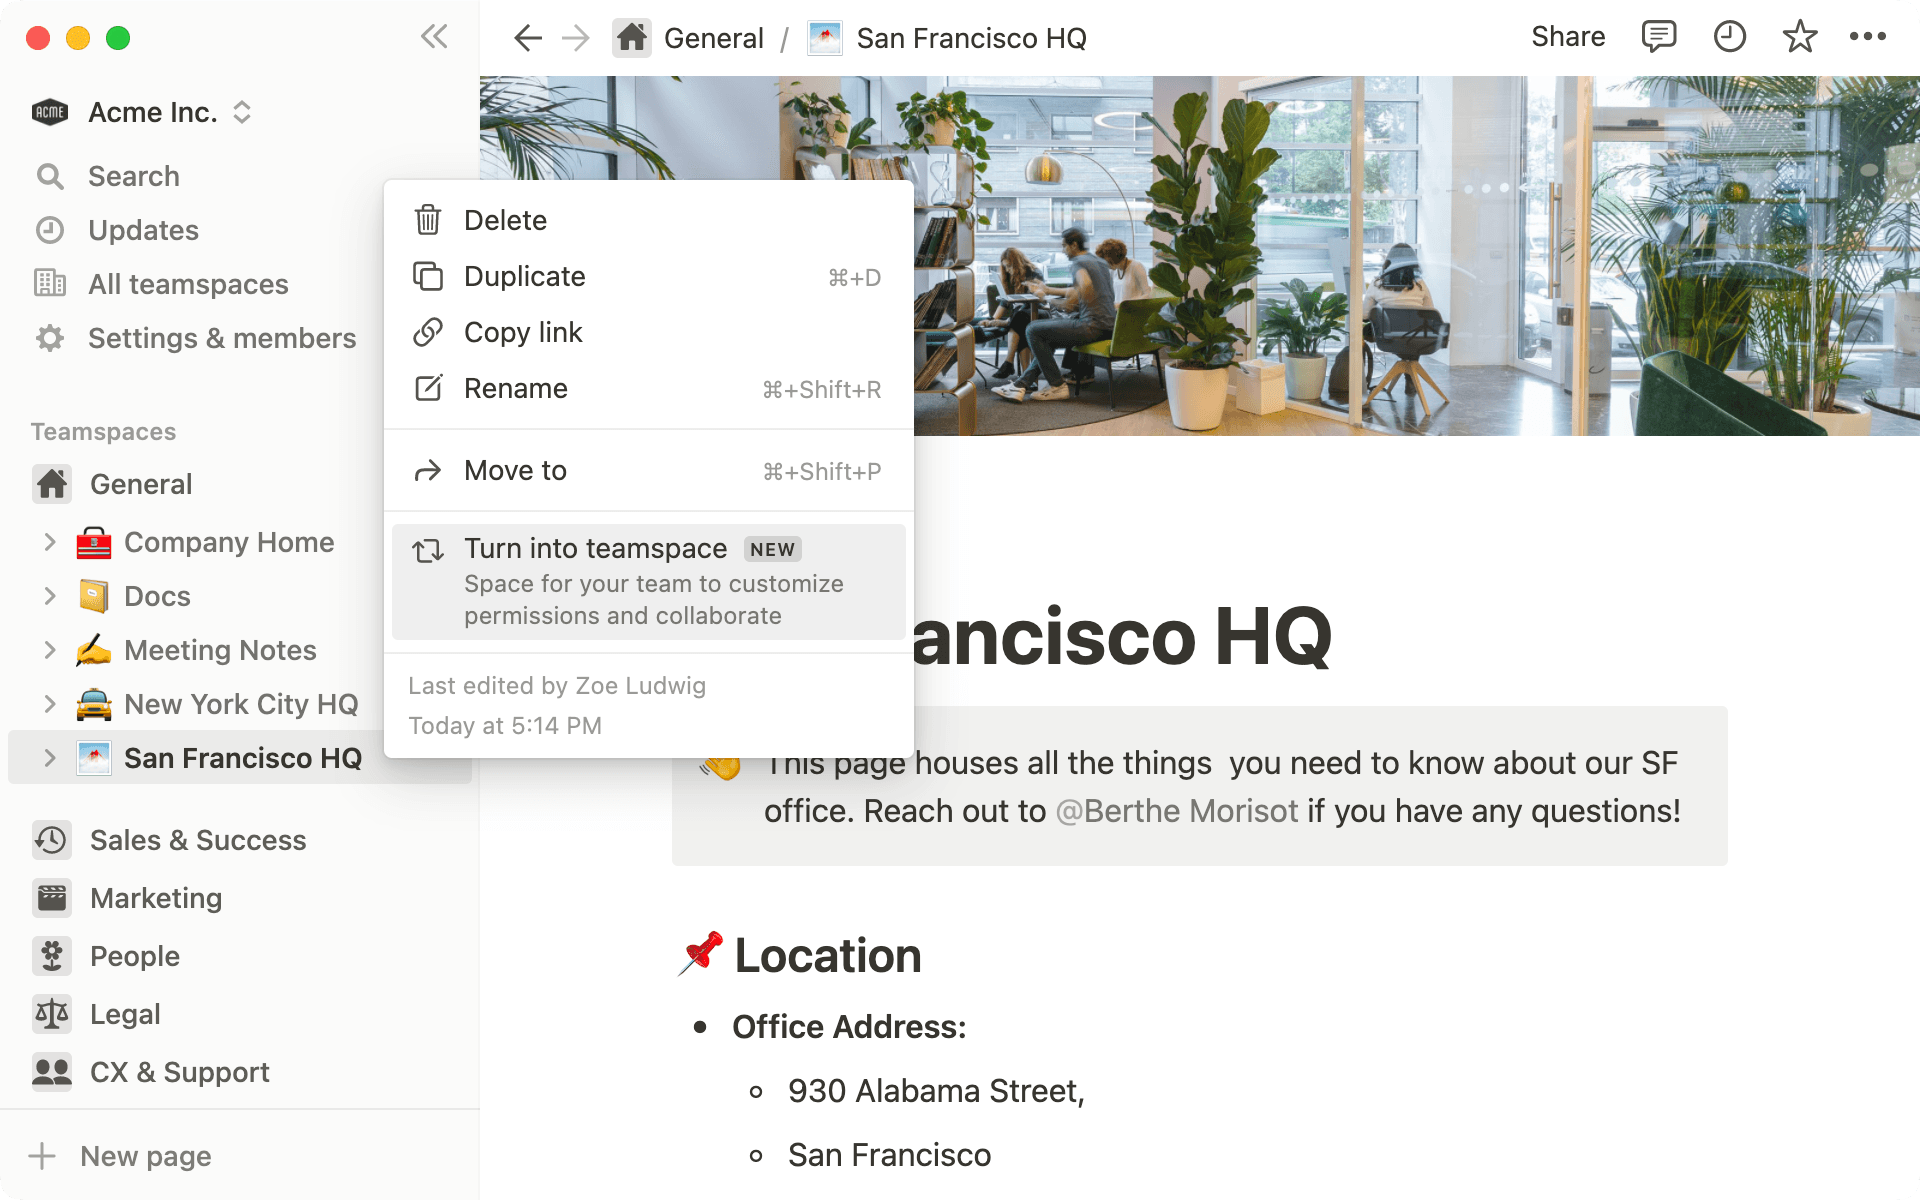
If you already have top-level pages for functional areas, office locations, or employee resource groups, that’s a great place to start. You can turn each of those top-level pages into a teamspace. Just hover over the page in the sidebar and click on the … icon and you’ll see a new option: Turn into teamspace. Note that full-page databases, or pages from within databases, cannot be turned into teamspaces.
Curious which types of pages make good teamspaces?
Once you’ve created the teamspace, it’s time to move relevant content into it. You can still drag pages into teamspaces, or you can use the Move to menu. Click on the ••• icon next to any page in the sidebar and choose Move to. In the pop-up menu, you’ll see the names of teamspaces listed as destinations. Note that you have to have Full access to a page in order to move it.
Understanding groups and provisioning content
Now that you have your teamspaces, let’s make sure they have the right people as part of them. Plus, you’ll be able to automatically provision the right content to the right people by using SCIM in combination with teamspaces.
The best way to manage the membership lists of your teamspaces is by using permission groups. You can configure these natively in Notion under Settings & Members, in the Members tab. If you’re on an Enterprise plan, we highly recommend using SCIM and any groups that you have already configured in your identity provider. Once a teamspace is created, you can add an entire permission group to it. That’s it!
Need to set up SCIM in your Notion workspace?
Before you add a group to a teamspace, make sure to check in with the leader of that team or group. They’ll need to know that their content will be moving to a teamspace, and you’ll want to make sure that they are assigned a Team Owner role.
If you are using SCIM to control your groups, you’ll have a few additional steps to ensure that your groups are always up-to-date with your latest hires.
Review the groups that you have set up in your identity provider. Determine which groups should be added to which teamspaces.
If you have ideas for lots of teamspaces without clearly defined groups in your identity provider, take a second pass through and determine if all of that segmentation is necessary.
Add new employees to the relevant group in your identity provider, and they will be automatically added to the corresponding teamspaces in Notion.
Ready for teamspaces? Here’s a checklist you can use to help your rollout be as smooth as possible:
Revisit your workspace settings to ensure that exporting, guests, and public page sharing are set how you want them
Revisit your member list to ensure that your workspace owners are accurate
Decide whether you want all members or only workspace owners to be able to create new teamspaces
Decide which pages will be converted into teamspaces, and what other content will be moved to those new teamspaces
Request
Full Accessto any pages you might need to move as part of this processDetermine if you will have any closed or private teamspaces
Communicate with any new teamspace owners about the changes that will be coming to the workspace
Check to make sure you have a current SCIM API token and that your SCIM configuration is working properly


Something we didn’t cover?